

Undead Pirate Haunted House Pages: Main Drunken Pirate Prisoner Monkey Skull Light
Undead Pirate Haunted House Room: Jack the Monkey
 The undead monkey was a project inspired by the fact that Disney hadn't yet
seen fit to release a life-sized version of the undead monkey Jack from the
movie Pirates of the Caribbean. Plus I needed a movie room for the
2006 Wyandotte Haunted House (movies were the Haunted House theme that year.) On top of all that, I'd wanted a life-sized
Jack, so this prop was a natural for me. I created him as the central prop for a
Pirates
of the Caribbean Room. I had learned how to do the rotting skin thing
with my various HEDZ, so that
was no big deal.
The undead monkey was a project inspired by the fact that Disney hadn't yet
seen fit to release a life-sized version of the undead monkey Jack from the
movie Pirates of the Caribbean. Plus I needed a movie room for the
2006 Wyandotte Haunted House (movies were the Haunted House theme that year.) On top of all that, I'd wanted a life-sized
Jack, so this prop was a natural for me. I created him as the central prop for a
Pirates
of the Caribbean Room. I had learned how to do the rotting skin thing
with my various HEDZ, so that
was no big deal.
The first challenge was obtaining reference photos, though. I didn't have any and couldn't find any on the web. I assume the legal department at Disney had had them removed, but who knows? Maybe no one cared to post Jack the (undead) Monkey photos. I learned a trick for plucking them off the DVD, however. You have to change your computer display settings so that the hardware accelerator is OFF. Doing this allowed me to pick any frozen frame screen, copy it to my picture software where I could crop, enhance and balance to pic to see the details. I now have a large library of Jack the (Undead) Monkey reference pics which you can see on the work bench in some of the photos below. (I won't post them, however. I don't want to fight with Disney's legal department.)
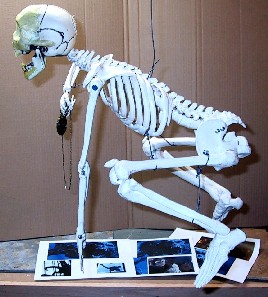
 We start with the under structure for an undead monkey: the skeleton. This
was key to the project because I didn't want to have to build the entire skeletal system myself as I had done on some other projects.
We start with the under structure for an undead monkey: the skeleton. This
was key to the project because I didn't want to have to build the entire skeletal system myself as I had done on some other projects.
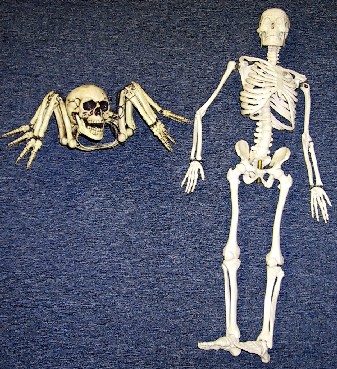
Fortunately, I had a small skeleton I had mistakenly purchased several years ago for another project (thinking it was child-sized - not a miniature version of an adult skeleton). Although it was useless for the project it was intended, it was perfect for this one.
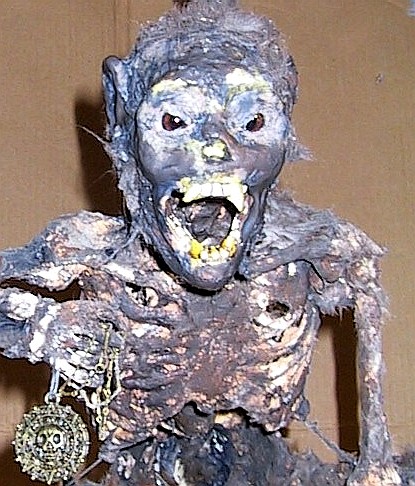
The skull didn't lend itself well to my idea for the monkey (based on my illicitly procured reference photos of Jack from the DVD), so I decided to use another skull - in this case the skull on one of those inexpensive spider/skeleton things. The skull was much larger. Since I intended the face to be the central feature of this guy, I thought that would be useful for the project.
I had intended to use the rib cage "body" of the spider, but I realized that would be a pain, so I scrapped it.
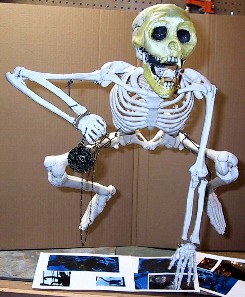
I chose to design Jack using the scene where the monkey swings down by his tail when Elizabeth is hiding under the stairs on the deck of the Black Pearl. The monkey is holding the medallion, so I had to pick one of those up for the prop. Good ol' eBay...
I first had to pose the little guy so he looked like the scene I wanted to use. The posing was achieved using a stiff black wire -which you can see if you look closely. I also discovered that the skeleton was screwed together with small screws that didn't seem to work for my purposes. They kept falling out! So you may notice large screws in his arm holding him together.
|
|
|
The next task was to adapt the skull to the skeleton. In the photo of his back, you'll note that there's a hole in his head. (Insert joke here.) This was to screw the head atop the conveniently provided threaded shaft of the backbone. (Note how happy he looks in the photo above left.) I also Sculpy'd the skull using a photo of a Capuchin monkey I found on the web. (Jack is a Capuchin Monk'. Ha!)
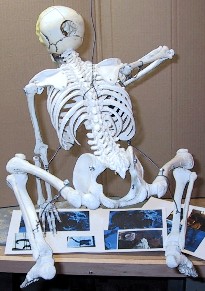
 Here are various photos of the monk' in process. The body is actually
completed as far as I was concerned. The head was still in development
this point. The tail is conspicuously absent.
Here are various photos of the monk' in process. The body is actually
completed as far as I was concerned. The head was still in development
this point. The tail is conspicuously absent.
I started with my rotting skin technique: liquid latex coated toilet paper that is judiciously ripped and sculpted (as much as it can be sculpted, that is) with a ceramic tool. Liquid latex is usually peach colored, however and it looked really odd. I wondered if I could just mix paint with the latex and, sure enough, I could.
 With this newfound knowledge, I created a greyish/brownish
color and mixed it with the latex. I used an old rabbit skin that was
the right color and added some of the fur to the mix.
I shaved it off using a razor blade and just sort of scattered it around
while the latex was still wet. It worked so well that I started using the
scrappy-looking shaved skin as well. I painted grey latex over much of the
peach, but liked the peach color here and there. Overall - a very good
effect, I think. Looks like roadkill, doesn't he? Since this is essentially
correct, I felt vindicated.
With this newfound knowledge, I created a greyish/brownish
color and mixed it with the latex. I used an old rabbit skin that was
the right color and added some of the fur to the mix.
I shaved it off using a razor blade and just sort of scattered it around
while the latex was still wet. It worked so well that I started using the
scrappy-looking shaved skin as well. I painted grey latex over much of the
peach, but liked the peach color here and there. Overall - a very good
effect, I think. Looks like roadkill, doesn't he? Since this is essentially
correct, I felt vindicated.
The head has peach colored Sculpy on it. It is not yet painted here because I was waiting to get the tail before using my TP and latex technique. I modeled the features as best I could off my reference photos. He looks really funny here because the fur and color don't match. Patience, grasshopper.
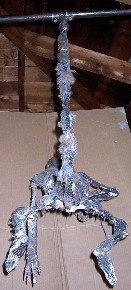
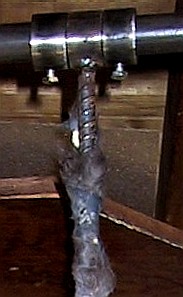
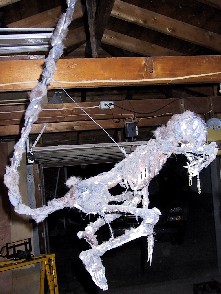
Below are several views of the finished prop in the garage that now serves as my haunted house "lab." You can now see the tail included here. I didn't shoot any photos of it in its pre-undead state. Basically, it's a piece of rerod with a small piece of pipe welded at the top to allow the monkey to swing back and forth for the haunt.
|
|
|
|
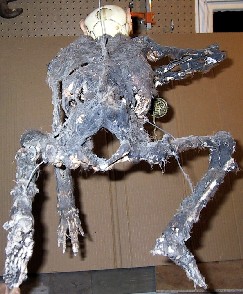
 Above you can see the rerod, the mounting and two
positioning pipes so I could move him back and forth after I got the rough
mounting placement. You can also see the rabbit fur attached with liquid
latex. Lovely, eh?
Above you can see the rerod, the mounting and two
positioning pipes so I could move him back and forth after I got the rough
mounting placement. You can also see the rabbit fur attached with liquid
latex. Lovely, eh?
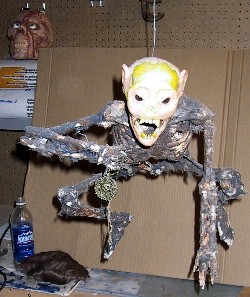
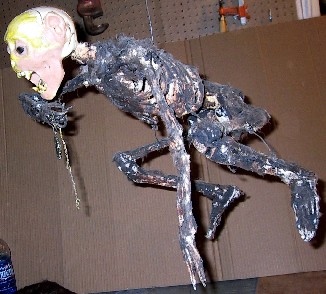
In the reference photos I plucked out of the movie, I noticed that in Jack's original undead state (as opposed to the scene after the credits where he steals another coin), you could see through his ribs. I worked diligently to maintain this, which you can really see well in the top right photo.
The peach latex mentioned above really shows up well in the front ribs. It's sort of odd to bother with a lot of details on such a thing, because once it gets in the dark, the details become irrelevant. But I have to be happy with the thing, you know?
You can also see the rabbit fur fairly well in this shot. It really added a finished look to the thing. (Well, you can call it a "finished" look...)
Another good way to add a finished look is to use glass eyes. I used to pain the eyes, but you can never get them near as good as the pair of true glass taxidermy eyes. Jack here has 16mm ASPW Aspherhic bear eyes, purchased from Van Dyke's. They're quite reasonably priced and they can ship quickly.
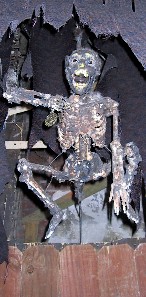
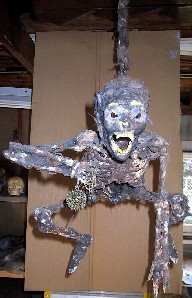
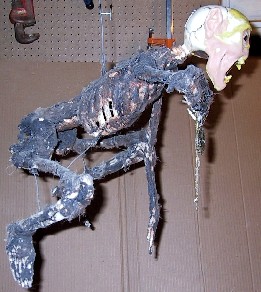
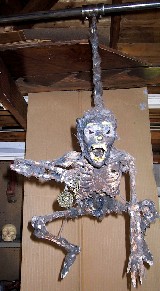
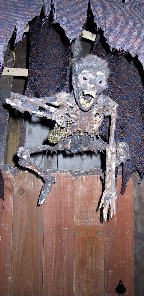 This is Jack as he appeared in the actual Undead Pirates of the Caribbean
haunt.
This is Jack as he appeared in the actual Undead Pirates of the Caribbean
haunt.
He swung down from what wound up being an absurdly complicated contraption that you can't see. It must be the engineer in me, because there was really no reason to create anything more complicated than a simple pulley system. The wood below the monkey is supposed to look like a door. (It's a distraction - to make people think the door will open and someone will jump out. The curtains are there to hide the mechanics. Sliced up, they reminded me of the Black Pearl's sails, so I went with it.
Keep in mind that you're seeing Jack in daylight conditions - which is not how most people will see him. Haunted Houses must be dark, spooky places, so a lot of the color differences would be lost. I did use a blue pin spotlight on the monk, to bring out his detail, though.