

Skeleton Garden Menu: Main Skeletons Skeleton Garden Skeleton Flowers Skeleton Tree
The Skeleton Garden Prop

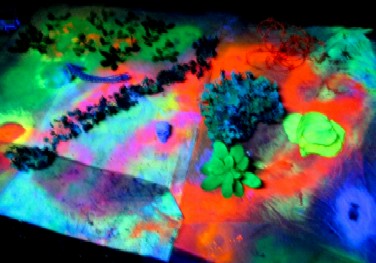
The Garden in the Skeleton Garden
The last prop I thought of for this room was the skeleton garden itself. This may seem surprising at first, but you must remember that it was never meant to be a skeleton garden. It was meant to be a parody of It's a Small World. When it became clear in the summer of 2013 that the singing skeleton flowers were not to be, I started re-gearing my concept. I was still planning a back yard with the skeleton tree and the random plants and skulls, but it was not very different that my original idea.
This all changed when I saw the large space that the Wyandotte Jaycees project chairman had reserved for me. It was huge! I quickly realized that my original idea was too small for the space and I needed something to occupy a large area in the haunt.
One of my neighbors had built an above ground garden this year, which was the initial idea for the skeleton garden. He had built two 2x12 frames and placed them in his side yard, filling them with dirt. Then he planted his garden in them.
I figured that would take a lot of space - I planned to make it 4' x 8' - and it would allow me to make all the little plants and skull things I had originally planned. Instead of just randomly setting them in the space, however, I could put them in neat, organized garden rows. So that's what happened. Getting there was a bit of a journey, however.
The Skeleton Plant Spouts
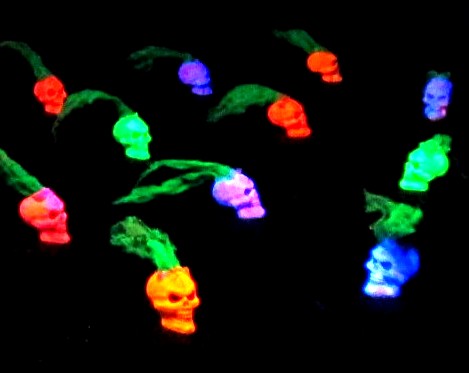
The Finished Sprouts in the Black Light
I had bought a bunch of strings of lights at K-Mart during the clearance sales in 2006. I didn't have a clear plan for them - I thought I might hang them on the skeleton tree or perhaps on branches mounted in the It's a Skull World space to look like small trees. There lights had plastic skulls with rags glued to their heads and Christmas tree type lights in them. As I considered the garden concept, I decided that if I could get the rags to stand up, I could paint them green and they would look like little skull plants sprouting from the ground. (I had the vague idea that they would like a big like onions, actually.)
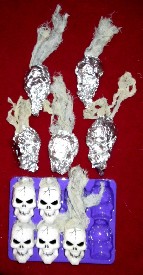
The Foil-Wrapped Sprouts
I had originally planned to put the lights into them, but after learning from working with the large skeleton flowers that the lights added little and after fighting to hide the cables and lights in the initial prop test, I abandoned that idea and just let the fluorescent paint and the black light make them work.
I decided that if they were to look like plants, they would have to have greenish tops and other-colored bulbs. This meant a two-phase painting operation.
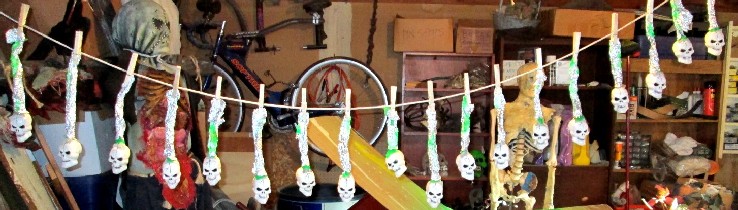
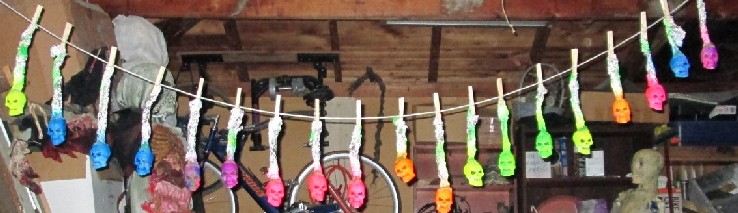
So I gathered up all the little skulls (there were 20 or so of them) and wrapped the skulls in tin foil. Then I hung them upside down from a clothesline, using clothes pins to grasp the tin foil at the bottom. I formed the rags on the top of the head into what looked most plant-like then and proceeded to spray paint the rags green. I added touches of yellow and orange in as well, although this effect mostly gets lost in the black light.
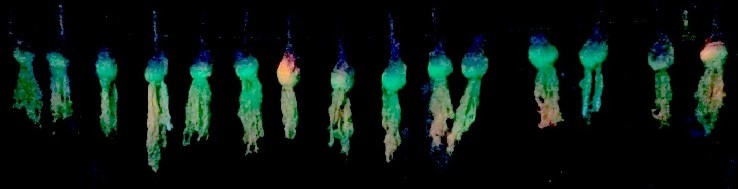 The Sprout Heads Wrapped in Foil, Hung With Clothes Pins and the Tops Painted - Here in the Black Light |
Once they dried, I pulled the foil off and used it to wrap the now painted sprout top rags. Then I hung them by the foil again and painted each of the skulls in various colors. I had thought about making them all the same color since that seems more like what you would get in a garden. Then again, you might get white, yellow, green and purple onions. Either way, I liked the idea of having lots of color in the Skeleton Garden haunt, so I went ahead and painted them all sorts of colors - even combining paint to get different shades.
 The Skeleton Garden Sprout Tops Wrapped in Foil, Waiting to be Painted |
 The Skeleton Garden Sprout Heads Painted in Day Light |
 The Skeleton Garden Sprout Heads Painted in the Black Light |
To mount the sprouts in the garden, I drilled holes through the bottom of each skull. I then ran screws up through the bottom of the garden platform (more on that later). The skulls could then be easily twisted onto the screws. This allowed them to be easily removed for transport. I figured they'd just shake loose when I was moving them and we'd have to tilt the whole garden sideways to get it in the door, so it was best if they were removable.
The Small Skeleton Flowers
The Small Skeleton Flowers in the Black Light
Also back in 2006, I had purchased a bunch of small foam skulls with the idea of scattering them around the It's a Skull World haunt. I don't recall if I had a specific plan for them or not. I know had planned to put green Astroturf on the floor of the haunt space in the room. (I wonder how that would have looked in black light?) Perhaps I intended to put the skulls in there somehow as plants? I did use one to create the prototype for the large skeleton flowers, so it was clearly somewhere in my head.
At any rate, when I started playing with the idea of creating a skeleton garden, I knew I wanted to put these things on small stems like the larger skeleton flowers, with the heads being framed by some sort of flower. I did not want to cut the flower petals out of cardboard, however. (I learned that when I was doing the prototype for the large skeleton flowers.)
So I toddled off to Hobby Lobby and checked out their artificial flower selection. They had a nice garland of white roses for half price which looked like it would work well. So I purchased that. Next was the problem of creating the stem. If you've read about the large skeleton flowers, you will recall that I used the leaves from some fake hosta plants to make the petals of those flowers. I still had the stems, so they became the stems of the small skeleton flowers. I cut them apart, intentionally making them different heights and stripped the wire on one end (to poke them into the soft foam skulls). I bent the opposite end of each stem at a 90 degree angle for mounting and added two sets of wires for tying them onto the wooden lattice was going to serve as the garden bed. (Again, more on that later.) Then they got painted fluorescent green.
 The Small Skeleton Flower Stems Painted Fluorescent Green |
 The Painted Stems in the Black Light |
Next up were the skulls. I again wanted to paint them all different colors because I liked the pot-luck variety it would give the garden. Plus it would make it a more interesting distraction for the room. So I divided them into groups and painted them red, yellow, blue and orange. You will also notice the backbone for the prototype skeleton flower in there. Because it had faded over the years, I repainted the head and spine stem for good measure.
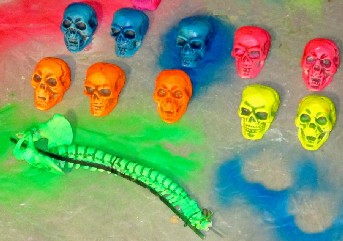 The Small Skeleton Flower Heads and Proto Spine Painted |
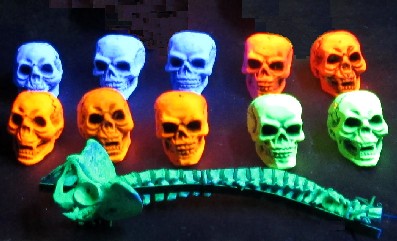 The Small Skeleton Flower Heads and Proto Spine in the black Light |
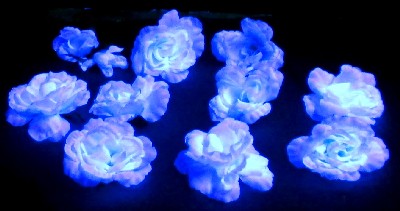
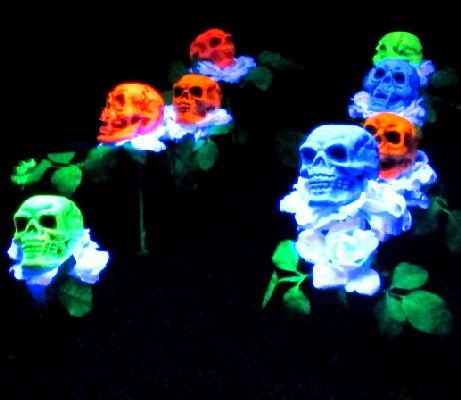
The Small Skeleton Flowers Roses in the Black Light
(There was
No Way Paint Was Going to Compete with THAT.)
Next was the flowers. I cut the roses off the garland just near the bottom of the flower. After I cut them off, I removed the center part of the flower so that the skulls would sit nicely in the middle. The flowers were build around a central wire, which I had just removed, but they still hung together fairly well. Even better, I found I could remove the wire stick the wire from the stems in its place. The flowers were white and at test proved they fluoresced nicely, so I didn't bother painting them. This meant they would all be white, but with the skulls in the center being multi-colored, I figured there was more than enough variety in color.
I wanted to do more than just stick the skulls on bare stems, though. The rose garland came to the rescue here. It had several different types of rose leaf clusters that were also attached to the second wire. It was that matter of a minute for me to remove these when I took the flowers off. I painted them with fluorescent green. and popped them onto the stem beneath the flower heads.
 Small Skeleton Flower Leaves Painted |
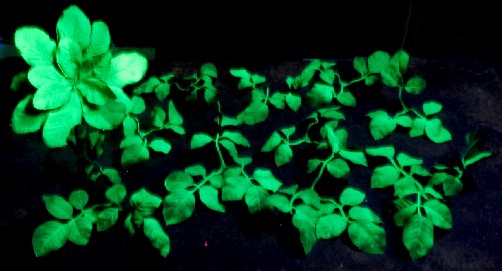 The Small Skeleton Flower Leaves in Black Light with a Large Plant Leaf Cluster |
The stems were then mounted to the board with the wires as I had planned. I left the leaves, flowers and skulls off for transport. (Nothing but gravity held them on and I didn't want to lose any of them.)
The Larger Skeleton Garden Plants
The Larger Plants in the Skeleton Garden
For whatever reason, I decided that the far end of the garden would contain a variety of plants. I think that this may be because it is how I plant my vegetable garden - 1/3 green beans, 1/3 cherry tomatoes and 1/3 random stuff that I buy that year. So this was the 1/3 of whatever part of the garden. The plants had been getting progressively larger as the garden went along, so this naturally had to contain the largest plants. As a result, there was also less room available, so there were fewer plants.
Like most of the parts of this prop, the germ of the idea came from my 2006 clearance purchases. I had found two medium-sized hard plastic skulls painted yellow and red at a store and I thought they'd make neat heads for a plant. (At least that's what I'm guessing I thought. I don't exactly recall, but I know I bought those two skulls for some reason and it wasn't to put on the tree because they were hollow and wouldn't stay there very well.
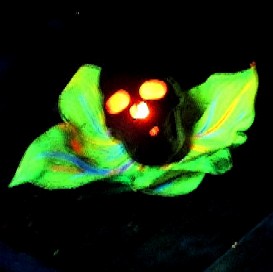
Curiously, although the two medium-sized skulls looked like they might glow in fluorescent light, they didn't. Not at all. So I wound up having to paint them in fluorescent colors with the rest of the skulls. Then I put the red one on a beefy stem I had designed and painted with the small skeleton flower stems. I used one of the small sets of hosta leaves I had painted for the large skeleton flowers to make the flower.
The yellow skull I placed on top of a bunch of foliage that I had purchased for $1 in a thrift store. (It had a flower on it when I bought it, but I removed that.) It was supposed to be sort of a cabbage-like thing.
 The Red and Yellow Medium-Sized Skulls |
 The Yellow 'Cabbage' Skull |
 The Red Flower Skull |
I had space for four free-standing plants in that part of the garden, which meant I had to come up with two more. I had seen some skulls that were covered in glitter at Big Lots. They were about the right size for the larger skeleton plants section of the garden. Wondering what glitter would look like in black lights, I bought one for $4 and tried it out. It glowed purple, so I got a large fake flower from Hobby Lobby and eviscerated the middle of the flower. Then I wired the glitter flower in place. You can see the results below center.
This left one spot in the garden. One of the things I had bought or the Poetry Haunt in 2000 was a black plastic skull with a flicker bulb inside of it. It also proved to be about the right size, so I painted up some more hosta leaves, stuck it in middle of them and had my fourth plant. The flicker bulb provided a neat addition to the garden.
 Daylight for the Larger Plants - See the Sparkle Skull? (Lower Left Corner) |
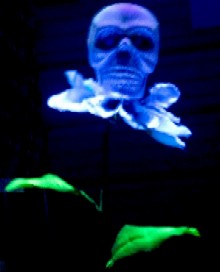 The Sparkle Skull on his Flower (He Looks Like a Supervillain.) |
 The Flicker Bulb Skull from the Poetry Haunt Nice Effect, eh? The Bulb is Dim Enough To Work. |
The last part of the larger plants section of the garden were the vines. I wanted pumpkin like vines with skulls for the vegetables. I had purchased some vines that had been used in the Velociraptor haunt in the 2004 haunted house, so I re-purposed those.
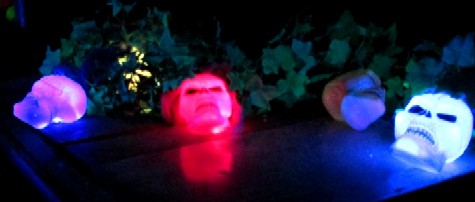
The Multi-Colored Skull Lights Used as Vine Vegetables
They were painted fluorescent green. I had also purchased some fake barbed wire at some point during my clearance sale shopping, so I decided the vines would have thorns. These were painted fluorescent red.
The skull vegetables were strings of alternating color skull lights that I had picked up in 2006. These were battery-operated, so I had to modify them so that they could be plugged into AC power because batteries tended to last about three nights in a haunted house. (There is a slew of Halloween stuff that is battery powered out there. I suspect this is done to make the product cheaper. Hey! Halloween decoration manufacturers! Stop making battery powered stuff! It doesn't last for crap!) All of these things were then zip-tied together and placed in the back half of the last third of the skeleton garden. I was afraid the lights might overpower the black light paint, but they didn't.
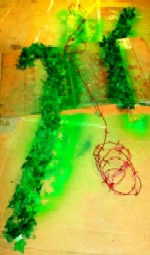 Vine & Barbs Painted |
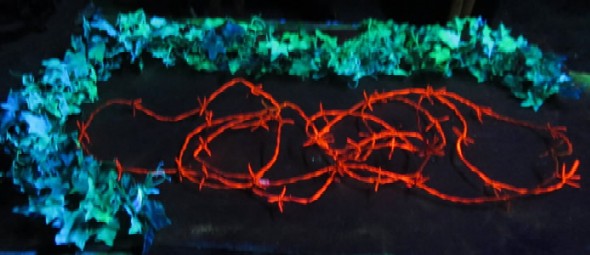 The Vine and Barbs in the Black Light |
The Skeleton Garden Bed
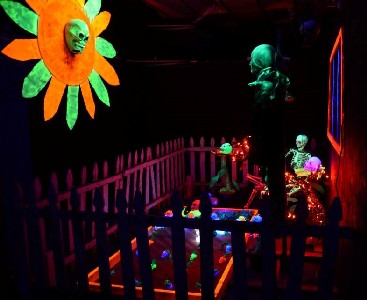
Photo: Delan Robbins
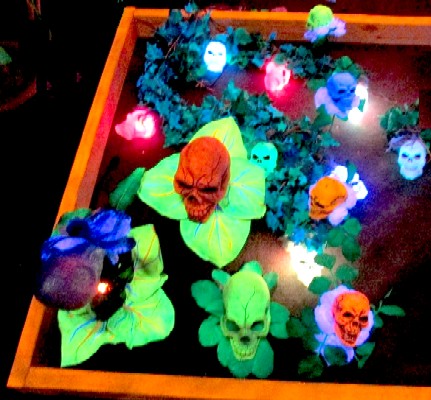
The Skeleton Garden in the Haunt
The last part of the garden may look the least interesting, but it was actually the most important: the bed of the garden itself. The original plan for the It's a Skull World haunt had been to Astroturf the whole room as I had mentioned. It occurred to me that while this would have cemented the back yard motif, it would be all but lost in the black light.
I did not abandon the carpet idea entirely, though. I knew there was a cheap brown carpeting that would look just like a garden bed, so I went to Home Depot and got enough of that to cover my 4' x 8' garden plot. I also picked up a piece of 4' x 8' wooden lattice to place beneath the carpeting.
The nice thing about the lattice was that it gave me a wooden platform that I could drill through as well as an open structure to hitch I could wire things. I originally figured the carpeting would nicely hide the wiring for the sprouts, but since the lights in them had been abandoned, that was irrelevant by the time the garden was built.
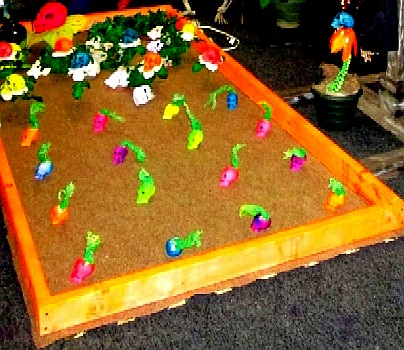
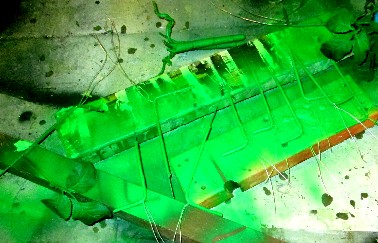
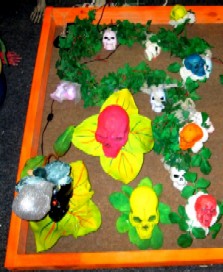
The Finished Skeleton Garden Bed in the Haunt (Normal Light)
This was not a random operation - despite what it may seem. I first painted the lattice so that if the wood poked through, it wouldn't reflect the black light. I then carefully marked each cross point on the bottom side to show where a plant would be situated, noting which were sprouts (with an 'SP'), which small plants ('P') and which were large plants ('L'). I did this because I knew I would be spending a lot of time wiring and drilling on the underside and I didn't want to lose my place.
I stapled carpeting to the top and then drilled the spots for the each of the plants. I put small drywall screws in the sprout locations to attach the plastic skull sprout heads. I fed the wire centered stems for the small flowers through their holes and did what was needed for the large plants. This proved to be a very effective platform for the flowers and it survived the entire house - plants intact.
Once I had attached all the plants and proved that they would work, I added the 2x4 frame to mimic what my neighbor had done with 2x12". Remembering the lesson of tree bark, I chose to spray the border with fluorescent orange. By way of a happy accident, the brown carpeting glowed just a bit in the black light as well, making the garden the unintended centerpiece of the room.
 The Painted Lattice and Carpet. Note the Alignment Marks. |
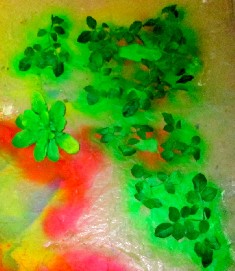
 Overspray Art on the Cardboard Used to Paint the Plants |